From the foregoing chapters in this handbook, it should be obvious that the variable factors of wind, temperature, humidity, gross weight, and structural differences of various helicopter models greatly affect the operation of the helicopter. Even when flying the same model helicopter, two flights are seldom exactly alike to the pilot because of variation in wind and density altitude. Therefore, it is practically impossible to prescribe helicopter attitudes for the performance of each flight maneuver since this handbook should generally apply to all helicopters having the characteristics set forth on page 1. Attitudes, airspeeds, altitudes, and power settings will vary to suit the weather, the particular helicopter, and the loading. For example, on a day with a 20-MPH wind and a 1,000-foot density altitude, a certain nose-low attitude and power setting will be required to hover and to initiate a departure from a hover to commence a normal takeoff; the following day, with a no-wind condition and a 2,500-foot density altitude, both the nose attitude and the power setting for hovering and initiating a departure from the hover may differ considerably in degree from the previous day. Obviously, then, it would be impossible for the handbook to outline a specific nose attitude and power setting for departure from a hover. Therefore, this chapter does not detail each and every attitude of a helicopter in the various flight maneuvers, nor each and every move a pilot must make in order to perform a given maneuver.
VERTICAL TAKEOFF TO A HOVER
A vertical takeoff (or takeoff to a hover) is a maneuver in which the helicopter is raised vertically from the surface to the normal hovering altitude with a minimum of lateral and/or fore and aft movement.
TECHNIQUE:
1. Head the helicopter into the wind, if possible.
2. Place the cyclic stick in the neutral position.
3. Be sure that the collective pitch stick is in the full down position.
4. Increase the throttle smoothly to obtain and maintain proper hover RPM.
5. Raise the collective pitch. Use smooth, continuous movement, coordinating throttle to maintain proper RPM setting. As collective pitch is increased and the helicopter becomes light on the skids, torque will tend to cause the nose to swing to the right unless the pilot adds a sufficient amount of left pedal to maintain a constant heading.
6. As the helicopter becomes light on the skids, make necessary cyclic stick corrections to ensure a level attitude (for the existing load and wind conditions) on becoming airborne, pedal corrections to maintain heading, and collective pitch corrections to ensure continuous vertical ascent to normal hovering altitude.
The higher the density altitude, hovering altitude should be lower.
7. When hovering altitude is reached, adjust throttle and collective pitch as required to maintain proper RPM and altitude. Coordinate pedal changes with throttle and collective changes to maintain heading and use cyclic as necessary to maintain a constant position over the spot. Remember - collective pitch controls altitude, cyclic pitch controls attitude and position.
8. Check engine and control operation, manifold pressure required to hover, and note cyclic stick position. Cyclic stick position will vary with amount and distribution of load and wind velocity.
COMMON ERRORS:
1. Failing to ascend vertically as the helicopter becomes airborne.
2. Pulling through on the collective after becoming airborne, causing the helicopter to gain too much altitude. This, in turn, necessitates comparatively large throttle and collective pitch changes.
3. Overcontrolling the pedals, which not only changes the heading of the helicopter but also changes RPM, thus necessitating constant throttle adjustment.
4. Reducing throttle rapidly in situations where proper RPM has been exceeded, which usually results in violent changes of heading to the left and loss of lift resulting in loss of altitude.
HOVERING
Hovering is a maneuver in which the helicopter is maintained in nearly motionless flight over a reference point at a constant altitude and on a constant heading. The maneuver requires a high degree of concentration and coordination on the part of the pilot. When hovering, a pilot holds the helicopter over a selected point by use of cyclic control; maintains altitude by use of collective pitch control; and maintains a constant heading by use of antitorque pedals. Only by proper coordination of all controls can successful hovering flight be achieved.
Control corrections should be pressure rather than abrupt movements. A constant pressure on the desired pedal will result in a smooth rate of turn; pronounced movements tend to jerk the nose around. If the helicopter tends to move forward, a slight amount of back pressure on the cyclic control stick will stop the forward movement. Just before the movement stops, back pressure must be released or the helicopter will come to a stop, and start into rearward flight. Avoid waiting out helicopter moves; make all corrections immediately. Stopping and stabilizing the helicopter at a hover requires a number of small corrections to avoid overcontrolling.
The attitude of the helicopter determines its movements over the surface. While the attitude required to hover varies with wind conditions and center-of-gravity location, there is a particular attitude which can be found by experimentation to keep the helicopter hovering over a selected point. After this attitude has been determined, deviations can be noted and necessary corrections made before the helicopter actually starts to move from the point.
Hovering altitude is maintained by use of collective pitch, coordinated with the throttle, to maintain a constant RPM. The amount of collective pitch needed to maintain hovering altitude varies with wind, air density (density altitude), and gross weight. When a steady wind is blowing, very little adjustment of the collective pitch stick should be required to hold a desired altitude. Only under variable and gusty wind conditions should any great collective pitch control changes be required.
Coordination of all controls cannot be overemphasized. Any change on one control will almost always require a coordinated correction on one or more of the other controls. Hovering can be accomplished in a precision manner only when corrections are small, smooth, and coordinated.
COMMON ERRORS:
1. Tenseness and slow reactions to movements of the helicopter.
2. Failure to allow for lag in cyclic and collective pitch control which leads to overcontrolling.
3. Confusing altitude changes for attitude changes, resulting in improper use of controls.
4. Hovering too high, creating a hazardous flight condition.
5. Hovering too low, resulting in occasional touchdown.
HOVERING TURN
A hovering turn is a maneuver performed at hovering altitude in which the nose of the helicopter is rotated left or right while maintaining position over a reference point on the surface. This maneuver requires the coordination of all flight controls and demands precision control near the surface. Constant altitude, rate of turn and RPM should be maintained.
TECHNIQUE:
1. Initiate the maneuver from a normal hovering altitude by applying pedal in the desired direction of turn.
2. As the nose begins to turn, and throughout the remainder of the turn, use cyclic control to maintain position over the surface reference point. Use pedals to maintain a slow, constant rate of turn, and use collective pitch, along with proper throttle coordination, to maintain a constant altitude and proper operating RPM.
3. As the 180° position is approached, anticipate the use of a small amount of opposite pedal. As the tail of the helicopter swings from a position into the wind to a position downwind, the helicopter will have a tendency to whip or increase its rate of turn as a result of the weathervaning tendency of the tail surface. The higher the winds, the greater the whipping action.
4. As the desired heading on which the turn is to be completed is approached, apply opposite pedal as necessary to stop the turn on this heading.
5. During a hovering turn to the left, the RPM will decrease if throttle is not added; in a hovering turn to the right, RPM will increase if throttle is not reduced slightly. (This is due to the amount of engine power that is being absorbed by the tail rotor which is dependent upon the pitch angle at which the tail rotor blades are operating.) Avoid making large corrections in RPM while turning since the throttle adjustment will result in erratic nose movements due to torque changes.
6. If you wish to determine the amount of left pedal available, make the first hovering turn to the left. If a 90° turn to the left cannot be made, or if an unusual amount of pedal is required to complete a 45° hovering turn to the left, do not attempt a turn to the right since sufficient left pedal may not be available to prevent an uncontrolled turn. Hovering power requires a large amount of left pedal to maintain heading. Sufficient left pedal in excess of this amount must be available to prevent an uncontrolled turn to the right once the turn has begun.
7. Hovering turns should be avoided in winds strong enough to preclude sufficient aft cyclic control to maintain the helicopter on the selected surface reference point when headed downwind. Check the helicopter flight manual for the manufacturer's recommendations for this limitation.
COMMON ERRORS:
1. Failing to maintain a slow, constant rate of turn.
2. Failing to maintain position over the reference point.
3. Failing to keep the RPM within normal operating range.
4. Failing to maintain constant altitude.
5. Failing to use pedals properly.
HOVERING - FORWARD FLIGHT
Forward hovering flight can generally be used to move the helicopter to a specific area unless strong winds prohibit crosswind or downwind hovering. A hovering turn is utilized to head the helicopter in the direction of the desired area, then forward flight at a slow speed is used to move to the area. During the maneuver, constant groundspeed, altitude, and heading should be maintained.
TECHNIQUE:
1. Before starting, pick out two references directly in front of the helicopter and in line with it. These reference points should be kept in line throughout the maneuver (fig. 69).
2. Begin the maneuver from a normal hovering altitude by applying forward pressure on the cyclic stick.
3. As movement begins, return the cyclic stick toward the neutral position to keep the groundspeed at a low rate - no faster than normal walking speed.
4. Throughout the maneuver, maintain a constant groundspeed and ground track with cyclic stick, a constant heading with pedals, a constant altitude with collective pitch control, and proper operating RPM with throttle.
5. To stop the forward movement, apply rearward cyclic pressure until the helicopter stops. As forward motion stops, the cyclic must be returned to the neutral position to prevent rearward movement. Forward movement can also be stopped by simply applying enough rearward cyclic pressure to level the helicopter and let it drift to a stop.
COMMON ERRORS:
1. Erratic movement of the cyclic stick, resulting in overcontrol and erratic movement over the surface.
2. Failure to use pedals properly, resulting in excessive heading changes.
3. Failure to maintain desired hovering altitude.
4. Failure to maintain proper RPM.
HOVERING - SIDEWARD FLIGHT
Sideward hovering flight may be necessary to move the helicopter to a specific area when conditions make it impossible to use forward flight. During the maneuver, a constant groundspeed, altitude, and heading should be maintained.
TECHNIQUE:
1. Before starting sideward flight, pick out two reference points in a line in the direction sideward flight is to be made to help you maintain proper ground track (fig. 68). These reference points should be kept in line throughout the maneuver.
Figure 68 - Use of reference points in maintaining proper ground track in sideward hovering flight.
2. Begin the maneuver from a normal hovering altitude by applying cyclic toward the side in which movement is desired.
3. As movement begins, return the cyclic stick toward the neutral position to keep the groundspeed at a slow rate - no faster than normal walking speed.
4. Throughout the maneuver, maintain a constant groundspeed and ground track with cyclic stick, a constant heading (perpendicular to the proposed ground track) with pedals, a constant altitude with collective pitch control, and proper operating RPM with throttle.
5. To stop the sideward movement, apply cyclic pressure in the direction opposite to that of movement, and hold it until the helicopter stops. As motion stops the cyclic stick must be returned to the neutral position to prevent movement in the opposite direction. Sideward movement also can be stopped by simply applying enough opposite cyclic pressure to level the helicopter. Then it will drift to a stop.
COMMON ERRORS:
1. Erratic movement of the cyclic stick, resulting in overcontrol and erratic movement over the surface.
2. Failure to use proper pedal control, resulting in excessive heading change.
3. Failure to maintain desired hovering altitude.
4. Failure to maintain proper RPM.
5. Failure to make clearing turns prior to starting the maneuver.
HOVERING - REARWARD FLIGHT
Rearward hovering flight may be necessary to move the helicopter to a specific area when the situation is such that forward or sideward flight cannot be used. During the maneuver, constant groundspeed, altitude, and heading should be maintained. The area behind the helicopter must be carefully cleared before the maneuver is begun.
TECHNIQUE:
1. Before starting rearward flight, pick out two reference points in front of, and in a line with the helicopter to help you maintain proper ground track (fig. 69). The movement of the helicopter should be such that these reference points remain in a line.
Figure 69 - Use of reference points in maintaining proper ground track in forward or rearward hovering flight.
2. Begin the maneuver from a normal hovering altitude by applying rearward pressure on the cyclic stick. After movement has begun, position the cyclic stick to maintain a slow groundspeed.
3. Throughout the maneuver, maintain constant groundspeed and ground track with cyclic stick, constant heading with pedals, and constant altitude with collective pitch control, along with throttle coordination, to maintain proper RPM.
4. To stop the rearward movement, apply forward cyclic and hold it until the helicopter stops. As the motion stops, return the cyclic stick to the neutral position. Also, as in the case of forward and sideward flight, forward cyclic can be used to level the helicopter and let it drift to a stop.
COMMON ERRORS:
1. Erratic movement of the cyclic stick, resulting in overcontrol and an uneven movement over the surface.
2. Failure to use pedals properly, resulting in excessive heading change.
3. Failure to maintain desired hovering altitude.
4. Failure to maintain proper RPM.
5. Failure to make clearing turns prior to starting the maneuver.
TAXIING
Taxiing is the intentional movement of the helicopter, under its own power, while remaining in contact with the surface.
TECHNIQUE:
1. The helicopter should be in a stationary position on the surface with the collective pitch full down, and the RPM the same as that which is used for hover operations.
2. Move the cyclic slightly forward of the neutral position and apply a gradual upward pressure on the collective pitch to move the helicopter forward along the surface. Use pedals to maintain heading and cyclic to maintain ground track.
3. The collective pitch controls starting, stopping, and rate of speed while taxiing. The higher the collective pitch, the faster will be the taxi speed. Taxi at a speed no greater than that of a normal walk.
4. During crosswind taxi, the cyclic should be held into the wind a sufficient amount to eliminate any drifting movement.
5. Maintain proper RPM at all times.
COMMON ERRORS:
1. Improper use of cyclic stick - using the cyclic to control starting, stopping, and rate of speed.
2. Failure to use pedals for heading control.
3. Improper use of controls during crosswind operations.
4. Failure to maintain proper RPM.
NORMAL TAKEOFF FROM A HOVER
Takeoff from a hover is an orderly transition to forward flight and is executed to increase altitude safely and expeditiously.
TECHNIQUE:
1. Bring the helicopter to a hover. Check engine and control operation. Note the cyclic stick position to determine if the aircraft is loaded properly. Check the manifold pressure required to hover to determine the amount of excess power available.
2. Visually clear the area all around.
3. Smoothly and slowly ease the cyclic stick forward. Apply just enough forward cyclic pressure to start the helicopter moving forward over the surface (fig. 70).
Figure 70 - Normal takeoff from a hover.
4. As the helicopter starts to move forward, increase collective pitch as necessary to prevent descending, and adjust throttle to maintain RPM. The increase in power will require an increase in left pedal to maintain heading. A straight takeoff path should be maintained throughout the takeoff.
5. As you accelerate to effective translational lift, the helicopter will begin to climb and the nose will tend to rise due to increased lift. At this point adjust collective pitch to obtain normal climb power and apply enough forward cyclic stick to overcome the tendency of the nose to rise. Hold an attitude that will allow a smooth acceleration toward climbing airspeed and a commensurate gain in altitude so that the takeoff profile will not take you through any of the crosshatched area of the height-velocity chart for the particular helicopter being flown. As airspeed is increased, the streamlining of the fuselage reduces engine torque effect, requiring a gradual reduction of left pedal.
6. As the helicopter continues to climb and airspeed approaches normal climb speed, apply aft cyclic stick pressure to raise the nose smoothly to the normal climb attitude.
COMMON ERRORS:
1. Failing to use sufficient collective pitch to prevent loss of altitude prior to attaining translational lift.
2. Adding power too rapidly at the beginning of the transition from hovering to forward flight without forward cyclic compensation, causing the helicopter to gain excessive altitude before acquiring airspeed.
3. Assuming an extreme nose-down attitude near the surface in the transition from hovering to forward flight.
4. Failing to maintain a straight flightpath over the surface (ground track).
5. Failing to maintain proper airspeed during the climb.
6. Failing to adjust the throttle to maintain proper RPM.
Crosswind considerations during takeoffs
If a takeoff is made during crosswind conditions, the helicopter is flown in a slip (p. 83) during the early stages of the maneuver. The cyclic pitch is held into the wind a sufficient amount to maintain the selected ground track for the takeoff, and the heading is kept straight along the takeoff path using the antitorque pedals (fig. 71). Thus, the ground track and fuselage are aligned with each other. In other words, the rotor is tilted into the wind so that the sideward movement of the helicopter is just enough to counteract the wind drift. To prevent the nose from turning in the direction of rotor tilt, it will be necessary to increase pedal pressure on the side opposite to rotor tilt. The stronger the crosswind component, the greater the amount of opposite pedal pressure required to maintain heading.
After approximately 50 feet of altitude is gained, a heading (crab) into the wind (fig. 71) should be established by a coordinated turn to maintain the desired ground track. The stronger the crosswind component, the more the helicopter will have to be turned into the wind to maintain desired ground track. Once straight-and-level flight on the desired heading is obtained, the pedals should continue to be used as necessary to compensate for torque to keep the helicopter in longitudinal trim.
NORMAL TAKEOFF FROM THE SURFACE
Normal takeoff from the surface is used to move the helicopter from a position on the surface into effective translational lift and a normal climb using a minimum amount of power.
TECHNIQUE:
1. Place the helicopter in a stationary position on the surface, lower the collective pitch to the full down position, and reduce the RPM below operating RPM. Visually clear the area and select terrain features or other objects to aid in maintaining the desired track during the takeoff and climbout.
2. Increase the throttle to proper RPM and raise the collective pitch slowly until the helicopter is light on the skids. Hesitate momentarily and adjust cyclic and pedals as necessary to prevent any surface movement.
fig. 71 - Comparison of the slip method and crab method of wind drift correction.
3. Continue to apply upward collective pitch and, as the helicopter breaks ground, use cyclic as necessary to assure forward movement as altitude is gained.
4. Continue to accelerate the aircraft and, as effective translational lift is attained, the helicopter will begin to climb. Adjust attitude and power, if necessary, to climb in the same manner as a takeoff from a hover.
COMMON ERRORS:
1. Departing the surface in an attitude that is too nose-low. This situation requires the use of excessive power to initiate a climb.
2. Using excessive power combined with too level an attitude, which causes a vertical climb.
3. Too abrupt application of the collective pitch when departing the surface, causing RPM and heading control errors.
STRAIGHT-AND-LEVEL FLIGHT
Straight-and-level flight is flight in which a constant altitude and heading are maintained. (The straight-and-level flight attitude is the attitude of the helicopter necessary to maintain straight-and-level flight. The level-flight attitude is the attitude of the helicopter necessary to maintain altitude. These terms are used throughout this handbook.)
The airspeed is determined by the attitude of the helicopter. The attitude of the helicopter is controlled by the movement of the cyclic control stick; altitude is primarily maintained by use of the collective pitch. To maintain forward flight, the rotor tip-path plane must be tilted forward to obtain the necessary horizontal thrust component from the main rotor. This will generally result in a nose-low attitude. The lower the nose, the greater the power required to maintain altitude (and the higher the resulting speed). Conversely, the greater the power used, the lower the nose must be to maintain altitude.
When in straight-and-level flight, an increase in collective pitch while holding airspeed constant with the cyclic control causes the helicopter to climb; a decrease in collective pitch while holding airspeed constant causes a descent. A correction on the collective pitch control requires coordinated correction on the throttle control in order to maintain a constant RPM, and on the antitorque pedals to maintain heading and to keep the helicopter in longitudinal trim. Coordinated flight should be maintained (that is, neither slipping nor skidding).
To increase airspeed in straight-and-level flight, apply forward pressure on the cyclic control stick and raise the collective pitch as necessary to maintain altitude. To decrease airspeed, apply aft pressure on the cyclic control stick and lower the collective pitch as necessary to maintain altitude.
Although cyclic pitch control is sensitive, there is a slight delay in control reaction and it will be necessary to anticipate actual movement of the helicopter. In making cyclic corrections to control the attitude or airspeed of a helicopter, care should be taken not to overcontrol. If the nose of the helicopter rises above the level-flight attitude, forward pressure is applied to the cyclic stick to bring the nose down. If this correction is held too long the nose will drop too low. Since the helicopter will continue to change attitude momentarily after the controls reach neutral, return the cyclic stick control to neutral slightly before the desired attitude is reached. This principle holds true for any cyclic pitch control correction.
The helicopter is inherently unstable. If gusts or turbulence cause the nose to drop, it will tend to continue dropping instead of returning to a straight-and-level attitude as would a fixed-wing aircraft. A pilot must remain alert and FLY the helicopter at all times.
COMMON ERRORS:
1. Failure to trim properly, tending to hold pedal pressure and opposite cyclic.
2. Failure to hold best airspeed. Aft cyclic pressure dissipates airspeed without significant climb.
3. Failure to recognize proper control position for maintaining crab-type drift correction.
TURNS
A turn is a maneuver used to change the heading of the helicopter. The aerodynamics of a turn have been discussed previously - lift components, loss of vertical lift, and load factors - and should be thoroughly understood.
Before beginning any turn, the area in the direction of the turn should be carefully cleared above, below, and at the flight level. To enter a turn from straight-and-level flight, apply sideward pressure on the cyclic stick in the direction the turn is to be made. This is the only control movement necessary to start the turn. Do not use the pedals to assist the turn. The pedals should be used to compensate for torque to keep the helicopter in longitudinal trim. The more the cyclic stick is displaced, the steeper the angle of bank; therefore, adjust the cyclic stick to obtain and maintain the desired bank throughout the turn. Increase collective pitch and throttle as necessary to maintain altitude and RPM, and increase left pedal pressure to counteract the added torque effect and to maintain longitudinal trim. Depending on the degree of bank, additional forward cyclic pressure may be required to maintain airspeed.
Recovery from the turn is the same as the entry except that pressure on the cyclic stick is applied in the opposite direction. Since the helicopter will continue to turn as long as there is any bank, start the rollout before reaching the desired heading.
The discussion on level turns is equally applicable to making turns while climbing or descending, the only difference being that the helicopter will be in a climbing or descending attitude rather than the level flight attitude. If a simultaneous entry is desired, merely combine the techniques of both maneuvers - climb or descent entry and turn entry.
Skids
A skid occurs when the helicopter slides sideways away from the center of the turn. It is caused by too much pedal pressure in the direction of turn, or by too little in the direction opposite the turn in relation to the amount of collective stick (power) used. If the helicopter is forced to turn faster with increased pedal pressure instead of by increasing the degree of bank, it will skid sideways away from the center of turn. Instead of flying in its normal curved pattern, it will fly a straighter course.
In a right climbing turn, if insufficient left pedal is applied to compensate for increased torque effect, a skid will occur. In a left climbing turn, if excessive left pedal is applied to compensate for increased torque effect, a skid will occur.
In a right descending turn, if excessive right pedal is applied to compensate for decreased torque, a skid will occur. In a left descending turn, if insufficient right pedal is applied to compensate for the decreased torque effect, a skid will occur.
A skid may also occur when flying straight-and-level if the nose of the helicopter is allowed to move sideways along the horizon. This condition occurs when improper pedal pressure is held to counteract torque and the helicopter is held level with cyclic control.
Slips
A slip occurs when the helicopter slides sideways toward the center of the turn. It is caused by an insufficient amount of pedal in the direction of turn (or too much in the direction opposite the turn) in relation to the amount of collective stick (power) used. In other words, if improper pedal pressure is held, keeping the nose from following the turn, the helicopter will slip sideways toward the center of turn.
In a right climbing turn, if excessive left pedal is applied to compensate for the increased torque effect, a slip will occur. In a left climbing turn, if insufficient left pedal is applied to compensate for the increased torque effect, a slip will occur.
In a right descending turn, if insufficient right pedal is applied to compensate for the decreased torque effect, a slip will occur. In a left descending turn, if excessive right pedal is applied to compensate for the decreased torque effect, a slip will occur.
A slip may also occur in straight-and-level flight if one side of the helicopter is low and the nose is held straight by pedal pressure. This is the technique used in correcting for a crosswind during an approach and during a takeoff when at a low altitude.
Summarizing then, a skid occurs when the rate of turn is too fast for the amount of bank being used; a slip occurs when the rate of turn is too slow for the amount of bank being used.
COMMON ERRORS:
1. Using pedal pressures for turns. This is usually not necessary for small helicopters.
NORMAL CLIMB
The entry into a climb from a hover has already been discussed under "Normal Takeoff From a Hover." This discussion will be limited to a climb entry from cruising flight.
TECHNIQUE:
1. To enter a climb from cruising flight, apply aft cyclic stick to obtain the approximate climb attitude; simultaneously increase collective pitch to obtain climb manifold pressure, adjust throttle to maintain or obtain climb RPM, and increase left pedal pressure to compensate for the increased torque.
2. As the airspeed approaches normal climb airspeed, make further adjustments of the cyclic control to obtain and hold this airspeed.
3. Throughout the maneuver, maintain climb attitude, heading, and airspeed with cyclic control, climb manifold pressure and RPM with collective pitch and throttle, and longitudinal trim with antitorque pedals.
4. To level off from a climb, start adjusting attitude to the level flight attitude a few feet prior to reaching the desired altitude. The amount of lead will depend upon the rate of climb at the time of level-off - the higher the rate of climb, the more the lead. Apply forward cyclic to adjust to and maintain the level flight attitude, which will be slightly nose low; maintain climb power until airspeed approaches desired cruising airspeed, at which time the collective should be lowered to obtain cruising manifold pressure and throttle adjusted to obtain and maintain cruising RPM. Throughout the level-off, maintain longitudinal trim and constant heading with pedals.
COMMON ERRORS:
1. Failure to hold proper manifold pressure and airspeed.
2. Holding too much or too little left pedal.
3. In level-off, decreasing power before lowering the nose to cruising attitude.
NORMAL DESCENT
A normal descent is a maneuver in which the helicopter loses altitude at a controlled rate while in a controlled attitude.
TECHNIQUE:
1. To establish a normal descent from straight-and-level flight at cruising airspeed, lower collective pitch to obtain proper manifold pressure, adjust throttle to maintain RPM, and increase right pedal to maintain heading. If cruising airspeed is the same as, or slightly above descending airspeed, simultaneously apply the necessary cyclic stick pressure to obtain the approximate descending attitude. If cruising airspeed is well above descending airspeed, the level flight attitude may be maintained until airspeed approaches descending airspeed, at which time the nose should be lowered to the descending attitude.
2. Throughout the maneuver, maintain descending attitude and airspeed with the cyclic control, descending manifold pressure and RPM with collective pitch and throttle, and heading with pedals.
3. To level off from the descent, lead the desired altitude by an amount that will depend upon the rate of descent at the time of level-off, for example, the higher the descent, the greater the lead. At this point, increase collective pitch to obtain cruising manifold pressure, adjust throttle to maintain RPM, increase left pedal pressure to maintain heading, and adjust cyclic stick to obtain cruising airspeed and the level flight attitude as the desired altitude is reached.
COMMON ERRORS:
1. Failure to hold constant angle of descent (training purposes only).
2. Failure to adjust pedal pressures for changes in power.
APPROACHES
An approach is a transition maneuver in which the helicopter is flown from traffic pattern altitude to a hover at normal hovering altitude and with zero groundspeed. It is basically a power glide made at an angle of descent corresponding to the type of approach that is made. A helicopter pilot should be proficient in performing three basic types of approaches - normal, steep, and shallow - and should know how to analyze influential outside factors, and know how to plan an approach to fit any particular situation. Choice of approach is governed by the size of the landing area, barriers in the approach path, type of surface, temperature, altitude, density altitude, wind direction, windspeed and gross weight.
All approaches should be regarded as precision approaches and should be made to a predetermined point. Rate of descent and airspeed are independently controlled by the pilot. Therefore, little tolerance should be given to overshooting a chosen landing spot. To maintain a maximum margin of safety in each type of approach, effective translational lift should be retained as long as practicable.
Factors to consider when making approaches
Evaluation of existing wind conditions must be made before starting an approach. Although the approach is generally made into the wind, conditions may indicate that entry will have to be made from a downwind or crosswind position. The traffic pattern is generally flown at normal or nearly normal cruise airspeed. The velocity of the wind determines the airspeed that will be maintained after the approach is initiated. Airspeed should be increased in proportion to any increased wind velocity. Angle of descent should remain constant, regardless of wind velocity.
Before attempting normal and steep approaches to a hover, the pilot should know that sufficient hovering power is available. For a shallow approach terminating in a running landing, a surface area of sufficient length and smoothness must be available.
Crosswind approaches are made by crabbing or slipping, or by a combination of both. To make running landings in strong crosswinds, it may be necessary to touch down initially with the windward (upwind) skid to avoid drifting.
RPM should remain constant during all approaches. If RPM is allowed to fluctuate or change abruptly, variations of torque forces will cause the fuselage to yaw around the vertical axis and control will be difficult. To maintain proper directional control, changes in RPM and/or collective pitch settings must be made smoothly and must be accompanied by appropriate changes in antitorque pedals.
NORMAL APPROACH TO A HOVER
A normal approach to a hover is basically a power glide made at an angle of descent of approximately 10° (fig. 72). This type of approach is used in the majority of cases.
TECHNIQUE:
1. The entry to the downwind leg should be made at a 45° angle to the downwind leg so that the actual turn to the downwind leg will be accomplished opposite the middle one-third of the runway. The transition from downwind leg to the final approach leg may be made by two 90° turns in which a definite base leg is established, or by a 180° turn. At all times during this transition, sufficient altitude should be available so that in case of engine failure, an autorotative landing can be completed into the wind. The point in the traffic pattern at which the power reduction is made should be determined by this fact.
Figure 72 - Normal approach to a hover.
2. Initiate the approach by lowering the collective pitch control the amount required to descend at an angle of approximately 10° on the final approach leg. As collective pitch is lowered, increase right pedal as necessary to compensate for the change in torque reaction to maintain heading, and adjust throttle to maintain proper RPM. Decelerate to the approximate airspeed, then further adjust attitude as necessary to maintain approach airspeed.
3. The angle of descent is primarily controlled by collective pitch, the airspeed is primarily controlled by the cyclic control, and heading on final approach is maintained with pedal control. However, only by the coordination of all controls can the approach be accomplished successfully.
4. The approach airspeed should be maintained until the point on the approach is reached where, through evaluation of apparent groundspeed, it is determined that forward airspeed must be progressively decreased in order to arrive at hovering altitude and attitude at the intended landing spot with zero groundspeed.
5. As forward airspeed is gradually reduced by the application of rearward cyclic, additional power (collective pitch) must be applied to compensate for the decrease in translational lift and to maintain the proper angle of descent. As collective pitch is increased, left pedal must be increased to maintain heading, throttle adjusted to maintain RPM, and cyclic pitch coordinated to maintain the proper rate of closure to the desired spot (a continual decrease in groundspeed).
6. The approach is terminated at hovering altitude above the intended landing point with zero groundspeed. If power has been properly applied during the final portion of the approach, very little additional power should be required during the termination.
7. If the condition of the landing spot is unknown, the approach may be terminated just short of the spot so that it can be checked before moving forward for the landing.
COMMON ERRORS:
1. Failing to maintain proper RPM during the entire approach.
2. Improper use of the collective pitch in controlling the angle of descent.
3. Failing to make pedal corrections to compensate for collective pitch changes during the approach.
4. Failing to arrive at hovering altitude, hovering attitude, and zero groundspeed almost simultaneously.
5. Low RPM in transition to the hover at the end of the approach.
6. Using too much aft cyclic stick close to the surface, which may result in tail rotor strikes.
Crosswind considerations in approaches
During the early stages of a crosswind approach, a crab and/or a slip may be used (fig. 71). During the final stages of an approach, beginning at approximately 50 feet of altitude, a slip should be used to align the fuselage with the ground track. The rotor is tilted into the wind (with cyclic pressure) enough so that the sideward movement of the helicopter and wind drift counteract each other. Heading is maintained along the ground track with the antitorque pedals. (See "Crosswind Considerations During Takeoffs.") This technique should be used on any type of crosswind approach - shallow, normal, or steep.
NORMAL APPROACH TO THE SURFACE
When it is known or suspected that loose snow or dust exists on your landing spot, an approach to the surface may be used. It may also be used when the surface is unfavorable for a running landing, and high density altitude or heavily loaded conditions exist.
TECHNIQUE:
The approach is the same as the normal approach to a hover. However, the approach should be continued to touchdown, terminating in a skids-level attitude with no forward movement.
COMMON ERRORS:
1. Terminating at a hover, then making a vertical landing.
2. Touching down with forward movement.
3. Approaching too slow, requiring the use of excessive power during the termination.
4. Approaching too fast, causing a hard landing.
STEEP APPROACH TO A HOVER
A steep approach is used primarily when there are obstacles in the approach path that are too high to allow a normal approach. A steep approach will permit entry into most confined areas and is sometimes used to avoid areas of turbulence around a pinnacle. An approach angle of approximately 15° is normally used for steep approaches (fig. 73).
TECHNIQUE:
1. Entry is made in the same way as for a normal approach, except that a greater reduction of collective pitch is usually required at the beginning of the approach to start the descent than for a normal approach. As collective pitch is lowered, increase right pedal to maintain heading and adjust throttle to maintain RPM.
2. As in a normal approach, the angle of descent is primarily controlled by collective pitch, and the speed is primarily controlled by the cyclic control. However, only by the coordination of all controls can the approach be accomplished successfully.
3. The approach airspeed should be maintained until the point on the approach is reached where, through evaluation of apparent groundspeed, it is determined that forward airspeed must be progressively decreased in order to arrive at hovering altitude at the intended landing spot with zero groundspeed. This is very important since a flare should not be made near the surface due to the danger of tail rotor strikes.
4. As forward airspeed is gradually reduced by the application of rearward cyclic pressure, additional power (collective pitch) must be applied to compensate for the decrease in translational lift and to maintain the proper angle of descent. As collective pitch is increased, left pedal must be increased to maintain heading, throttle adjusted to maintain RPM, and cyclic pitch coordinated to maintain the proper change in forward airspeed.
5. Since the angle of descent on a steep approach is much steeper than for a normal approach, the collective pitch must be used much sooner at the bottom of the approach. The approach is terminated at hovering altitude above the intended landing point with zero groundspeed. If power has been properly applied during the final portion of the approach, very little additional power should be required during the termination.
COMMON ERRORS:
1. Failing to maintain proper RPM during the entire approach.
2. Improper use of collective pitch in controlling the angle of descent.
3. Failing to make pedal corrections to compensate for collective pitch changes during the approach.
Figure 73 - Steep approach to a hover.
4. Slowing airspeed excessively in order to remain on the proper angle of descent.
5. Failing to arrive at hovering altitude, hovering attitude, and zero groundspeed almost simultaneously.
6. Low RPM in transition to the hover at the end of the approach.
7. Using too much aft cyclic stick close to the surface, which may result in tail rotor strikes.
LANDING FROM A HOVER
In this maneuver, the helicopter is landed vertically from a hover.
TECHNIQUE:
1. From a hover, begin a descent by applying a slow but very gradual downward pressure on the collective pitch stick. This smooth application of collective pitch should be such that a constant rate of descent is maintained to the surface. As the skids descend within a few inches of the surface, the ground effect becomes very noticeable and the helicopter tends to stop its descent. At this point, it may be necessary to further decrease the collective pitch stick a slight amount to maintain the constant rate of descent.
2. When the skids touch the surface, lower the collective pitch smoothly and firmly to the full down position, adjust the throttle to keep RPM in the proper range, and at the same time add right pedal as needed to maintain heading.
3. Throughout the descent and until the time the skids are firmly on the surface and the collective pitch is in full down position, make necessary corrections with pedals to maintain a constant heading, and necessary corrections with the cyclic control to maintain a level attitude (for existing load and wind conditions) and prevent movement over the surface.
COMMON ERRORS:
1. Overcontrolling the cyclic control during descent resulting in movement over the surface on contact.
2. Failing to use collective pitch smoothly.
3. Pulling back on the cyclic stick prior to or upon touchdown.
4. Failing to reduce the collective pitch smoothly and positively to the full down position upon contact with the surface.
5. Failing to maintain a constant rate of descent.
6. Failing to maintain proper RPM.
SHALLOW APPROACH AND RUNNING LANDING
A shallow approach and running landing (fig. 74) are used when a high-density altitude or a high gross weight condition or some combination thereof is such that a normal or steep approach cannot be made because of insufficient power to hover. To compensate for this lack of power, a shallow approach and running landing makes use of translational lift until surface contact is made. The glide angle is approximately 5°. Since a running landing follows a shallow approach, a surface area of sufficient length and smoothness must be available.
TECHNIQUE:
1. A shallow approach is initiated in the same manner as the normal approach except that a shallower angle of descent is maintained. The power reduction to initiate the desired angle of descent will be less than that for a normal approach since the angle of descent is less. As collective pitch is lowered, maintain heading by increasing right pedal pressure, adjust throttle to maintain RPM, and use cyclic as necessary to maintain the desired approach airspeed.
2. As in normal and steep approaches, the angle of descent and rate of descent are primarily controlled by collective pitch, and the groundspeed is primarily controlled by the cyclic control. The coordination of all controls is needed, however, if the approach is to be accomplished successfully.
3. Approach airspeed should be maintained until an altitude of approximately 50 feet above the surface has been reached. At this point, gradually apply aft cyclic stick to start dissipating airspeed and coordinate a slight downward pressure on the collective pitch to maintain the angle of descent. The deceleration of the airspeed should be enough so that the helicopter will tend to descend to the surface due to the decreased effect of translational lift just as the landing spot is reached. Since translational lift diminishes rapidly at slow airspeeds, the deceleration must be smoothly coordinated, at the same time keeping enough lift to prevent the helicopter from settling abruptly.
Figure 74 - Running landing.
4. On the final part of the approach, prior to making surface contact, the helicopter should be placed in a level attitude with cyclic control, pedals should be used to maintain heading, and cyclic stick should be used as necessary so that heading and ground track are identical. Allow the helicopter to descend gently to the surface in a straight-and-level attitude, cushioning the landing by proper manipulation of the collective pitch.
5. After surface contact, the cyclic control should be placed slightly forward of neutral to tilt the main rotor away from the tail boom; antitorque pedals should be used to maintain heading; throttle should be used to maintain RPM; and cyclic stick should be used to maintain surface track. Normally, the collective pitch is held stationary after touchdown until the helicopter comes to a complete stop. However, if braking action is desired or required, the collective pitch may be lowered cautiously. To ensure directional control, normal rotor RPM must be maintained until the helicopter stops.
COMMON ERRORS:
1. Assuming excessive nose-high attitude at approximately 10 feet of altitude.
2. Insufficient collective pitch and throttle to cushion landing.
3. Failing to add left pedal as collective pitch is added to cushion landing, resulting in a touchdown while in a left skid.
4. Touching down at an excessive groundspeed for the existing conditions (20 MPH groundspeed in most cases would be considered maximum allowable).
5. Failing to touch down in a level attitude.
6. Failing to maintain proper RPM during and after touchdown.
7. Poor directional control upon touchdown.
RUNNING TAKEOFF
A running takeoff (fig. 75) is used when conditions of load and/or density altitude prevent a sustained hover at normal hovering altitude. It is often referred to as a high-altitude takeoff. With insufficient power to hover, at least momentarily or at a very low altitude, a running takeoff is not advisable. No takeoff should be attempted if the helicopter cannot be lifted off the surface momentarily at full power because:
1 - If the helicopter cannot be hovered, its performance is unpredictable.
2 - If the helicopter cannot be raised off the surface at all, sufficient power might not be available for a safe running takeoff. A running takeoff may be accomplished safely only if surface area of sufficient length and smoothness is available, and if no barriers exist in the flightpath to interfere with a shallow climb.
Figure 75 - High altitude (running) takeoff.
TECHNIQUE:
1. Head the helicopter into the wind.
2. Increase the throttle to obtain takeoff RPM.
3. Hold the cyclic stick slightly forward of the hovering neutral position. Apply collective pitch slowly to accelerate into forward movement. (During practice, a manifold pressure of 1 to 2 inches below that which is required to hover may be used.)
4. Maintain a straight ground track with lateral cyclic control and heading with antitorque pedals until a climb is established.
5. As effective translational lift is gained, slight back pressure on the cyclic stick will take the helicopter into airborne flight smoothly, in a level attitude, with little or no pitching.
6. Maintain an altitude not to exceed 10 feet to allow airspeed to increase toward normal climb speed and follow a climb profile that will take you through the clear area of the height-velocity curve for the particular helicopter.
7. During practice maneuvers, climb to 50 feet then adjust power to normal climb power, and attitude to normal climb attitude.
COMMON ERRORS:
1. Failing to align heading and ground track to keep surface friction to a minimum.
2. Attempting to pull the helicopter off the surface before effective translational lift is obtained.
3. Lowering the nose too much after becoming airborne resulting in the helicopter settling back to the surface.
4. Failing to remain below approximately 10 feet of altitude until airspeed approaches normal climb speed.
MAXIMUM PERFORMANCE TAKEOFF
A maximum performance takeoff is used to climb at a steep angle to clear barriers in the flightpath (fig. 76). It can be used when taking off from small fields surrounded by high obstacles. Before attempting a maximum performance takeoff, you must know thoroughly the capabilities and limitations of your equipment. You must take into consideration the wind velocity, temperature, altitude, density altitude, gross weight, center-of-gravity location, and other factors affecting your technique and the performance of the helicopter. To safely accomplish this type of takeoff, sufficient power to hover must be available to prevent the helicopter from sinking back to the surface after becoming airborne. This maneuver will result in a steep climb, affording maximum altitude gain in a minimum distance forward.
The angle of climb for a maximum performance takeoff will depend on existing conditions. The more critical the conditions - high density altitudes, calm winds, etc. - the shallower the angle of climb should be. Use caution in climbing steeply. If the airspeed is allowed to get too low, the helicopter may settle back to the surface. The height-velocity (H/V) chart for the particular helicopter should be fully considered before making any maximum performance takeoff. An engine failure at low altitude and airspeed would place the helicopter in a dangerous position, requiring a high degree of skill in making a safe autorotative landing. It may be necessary to operate in the shaded area of the H/V diagram during the beginning of this maneuver when operating in light or no-wind conditions. The angle of climb and resulting airspeed will be dictated by the proximity and height of the obstacles to be cleared. The pilot must be aware of the calculated risk involved when operating in the shaded area of the H/V diagram.
TECHNIQUE:
1. The helicopter should be headed generally into the wind and the cyclic stick placed in what would be the neutral position for hovering under the existing load and wind conditions. (This position could be checked by hovering the helicopter momentarily prior to preparing to make a maximum performance takeoff.)
2. Establish the proper RPM setting and apply sufficient collective pitch to lighten the helicopter on its landing gear (fig. 76). Apply the maximum amount of collective pitch that can be obtained without reducing RPM and simultaneously add full throttle (maximum pitch and full throttle may be impractical or at least unnecessary on some helicopters, particularly on those equipped with supercharged engines) and sufficient forward cyclic stick to establish a forward climbing attitude as the helicopter leaves the surface. Apply necessary antitorque pedal control to maintain heading. RPM must not be sacrificed to obtain increased pitch on the rotor blades. If RPM starts to decrease under a full power condition, it can be regained only by reducing collective pitch.
3. Utilize full power until the helicopter is clear of all obstacles, after which a normal climb can be established and power reduced.
COMMON ERRORS:
1. Nose too low initially causing horizontal flight rather than more vertical flight.
2. Failure to maintain maximum permissible RPM.
3. Control movements too abrupt.
AUTOROTATIONS
In helicopter flying, an autorotation is a maneuver that can be performed by the pilot whenever the engine is no longer supplying power to the main rotor blades. A helicopter transmission is designed to allow the main rotor to rotate freely in its original direction if the engine stops. At the instant of engine failure, the blades will be producing lift and thrust from their angle of attack and velocity. By immediately lowering collective pitch (which must be done in case of engine failure), lift and drag will be reduced, and the helicopter will begin an immediate descent, thus producing an upward flow of air through the rotor system. The impact of this upward flow of air on the rotor blades produces a "ram" effect which provides sufficient thrust to maintain rotor RPM throughout the descent. Since the tall rotor is driven by the main rotor during autorotation, heading control can be maintained as in normal flight.
Several factors affect the rate of descent in autorotation - air density (density altitude), gross weight, rotor RPM, and airspeed. The pilot's primary control of the rate of descent is the airspeed. Higher or lower airspeed is obtained with the cyclic control just as in normal flight. A pilot has a choice in angle of descent varying from vertical descent to maximum range (minimum angle of descent). Rate of descent is high at zero airspeed and decreases to a minimum somewhere in the neighborhood of 50 to 60 miles per hour, depending upon the particular helicopter and the factors just mentioned. As the airspeed increases beyond that which gives minimum rate of descent, the rate of descent increases again. When an autorotative landing is to be made, the energy stored in the rotating blades can be used by the pilot to decrease the rate of descent and make a safe landing. A greater amount of rotor energy is required to stop a helicopter with a high rate of descent than is required to stop a helicopter that is descending more slowly. It follows then that autorotative descents at very low or very high airspeeds are more critical than those performed at the proper airspeed for the minimum rate of descent.
Figure 76 - Maximum performance takeoff.
Each type of helicopter has a specific airspeed at which a power-off glide is most efficient. The best airspeed is the one which combines the most desirable (greatest) glide range with the most desirable (slowest) rate of descent. The specific airspeed is somewhat different for each type of helicopter, yet certain factors affect all configurations in the same manner. For specific autorotation airspeeds for a particular helicopter refer to the helicopter flight manual.
The specific airspeed for autorotations is established for each type of helicopter on the basis of average weather and wind conditions, and normal loading. When the helicopter is operated with excessive loads in high density altitude or strong gusty wind conditions, best performance is achieved from a slightly increased airspeed in the descent. For autorotations in light winds, low density altitude, and light loading, best performance is achieved from a slight decrease in normal airspeed. Following this general procedure of fitting airspeed to existing conditions, a pilot can achieve approximately the same glide angle in any set of circumstances and estimate the touchdown point.
When making turns during an autorotative descent, generally use cyclic control only. Use of antitorque pedals to assist or speed the turn causes loss of airspeed and downward pitching of the nose - especially when left pedal is used. When the autorotation is initiated, sufficient right pedal pressure should be used to maintain straight flight and prevent yawing to the left. This pressure should not be changed to assist the turn.
If rotor RPM becomes too high during an autorotative approach, collective pitch should be raised sufficiently to decrease RPM to the normal operating range, then lowered all the way again. This procedure may be repeated as necessary.
If the throttle has not been closed in practice autorotations, it will be necessary to reduce it as collective pitch is raised; otherwise, the engine and rotor will reengage. After the collective is lowered, the throttle should be readjusted to maintain a safe engine RPM.
RPM is most likely to increase above the maximum limit during a turn due to the increased back cyclic stick pressure which induces a greater airflow through the rotor system. The tighter the turn and the heavier the gross weight, the higher the RPM will be.
HOVERING AUTOROTATION
As the name implies, hovering autorotations are made from a hover. They are practiced so that a pilot will automatically make the correct response when confronted with engine stoppage or certain other inflight emergencies while hovering.
TECHNIQUE:
1. To practice hovering autorotations, establish a normal hovering altitude for the particular helicopter being used, considering its load and the atmospheric conditions, and keep the helicopter headed into the wind. Hold maximum allowable RPM.
2. To enter autorotation, close the throttle quickly to ensure a clean split of the needles. This disengages the driving force of the engine from the rotor, thus eliminating torque effect. As the throttle is closed, right pedal must be applied to maintain heading. Usually, a slight amount of right cyclic stick will be necessary to keep the helicopter from drifting to the left, but use cyclic control as required to ensure a vertical descent and a level attitude. Leave the collective pitch where it is on entry.
3. In helicopters with low inertia rotor systems, the aircraft will begin to settle immediately. Keep a level attitude and ensure a vertical descent with cyclic control, heading with pedals, and apply upward collective pitch as necessary (generally the full amount is required) to slow the descent and cushion the landing. As upward collective pitch is applied, the throttle will have to be held in the closed position to prevent the rotor from re-engaging.
4. In helicopters with high inertia rotor systems, the aircraft will maintain altitude momentarily after the throttle is closed. Then, as the rotor RPM decreases, the helicopter will start to settle. As it settles, apply upward collective pitch (while holding the throttle in the closed position) to slow the descent and cushion the landing. The timing of this collective pitch ap- plication, and the rate at which it should be applied, will depend upon the particular helicopter being used, its gross weight, and the existing atmospheric conditions. Cyclic control is used to maintain a level attitude and to ensure a vertical descent. Heading is maintained with pedals.
5. When the weight of the helicopter is entirely on the skids, the application of upward collective pitch should cease. When the helicopter has come to a complete stop, lower the collective pitch to the full down position.
6. The timing of the collective pitch is a most important consideration. If it is applied too soon, the remaining RPM may not be sufficient to make a smooth landing. On the other hand, if collective pitch is applied too late, surface contact may be made before sufficient blade pitch is available to cushion the landing.
7. When entering the autorotation, the throttle should be rotated to the closed or override position to prevent the engine from re-engaging during the collective pitch application.
COMMON ERRORS:
1. Failing to use sufficient right pedal when power is reduced.
2. Failing to stop all sideward or backward movement prior to touchdown.
3. Failing to apply up-collective pitch properly, resulting in a hard touchdown.
4. Failing to touch down in a level attitude.
NO-FLARE AUTOROTATION
A no-flare autorotation can be used when the selected landing area is sufficiently long and smooth to permit a surface run. Practice no-flare autorotations may be made as follows.
TECHNIQUE:
1. When the desired position to begin the autorotation has been reached, place the collective pitch stick in the full-down position, maintaining cruising RPM with throttle. Decrease throttle to ensure a clean split of the needles and apply sufficient right pedal to maintain the desired heading. After splitting the needles, readjust the throttle so as to keep engine RPM well above normal idling speed but not high enough to cause rejoining of the needles. (The manufacturer will often recommend the RPM to use.)
2. Adjust attitude with cyclic control to obtain the best gliding speed (slowest rate of descent). Be sure to hold collective pitch in the full-down position. If it is permitted to rise, rotor RPM will decrease due to the increased drag from the increased pitch angle of the blades. At approximately 50 feet above the surface (check the manufacturer's recommendation for each helicopter), raise the nose slightly to obtain the desired landing speed and to slow the rate of descent.
3. If a landing is to be made from the autorotative approach, the throttle should be rotated to the closed or override position at this time and held in this position as collective pitch is raised so that the rotor will not re-engage. As the helicopter approaches normal hovering altitude, maintain a landing attitude with cyclic control, maintain heading with pedals, apply sufficient collective pitch (while holding the throttle in the closed position) to cushion the touchdown, and be sure the helicopter is landing parallel to its direction of motion upon contact with the surface. Avoid landing on the heels of the skid gear. The timing of the collective pitch application and the amount applied will be dependent on the rate of descent.
4. After surface contact is made, collective pitch may be increased (while holding the throttle in the closed position) to keep the helicopter light on the skids and allow it to slow down gradually; or it may be held stationary resulting in a shorter ground run; or it may be lowered cautiously for additional braking action, if required, due to a fast touchdown and limited landing area. Cyclic control stick should be held slightly forward of neutral and used to maintain groundtrack if landing is made in a crosswind. Pedals should be used to maintain heading. In the event insufficient pedal is available to maintain heading control as the rotor RPM decreases after touchdown, cyclic control should be applied in the direction of the turn.
5. After the helicopter has stopped, lower the collective pitch to the full-down position.
6. If a power recovery is to be made from practice autorotative approaches, the procedures in (3), (4), and (5) should be replaced with the procedures given under "Power Recovery From Practice Autorotations."
COMMON ERRORS:
1. Failing to use sufficient right pedal when power is reduced.
2. Lowering the nose too abruptly when power is reduced, thus placing the helicopter in a dive.
3. Failing to maintain full-down-collective pitch during the descent.
4. Application of up-collective pitch at an excessive altitude resulting in a hard landing, loss of heading control, and possible damage to the tail rotor and to the main rotor blade stops.
5. Pulling the nose up just prior to touchdown.
FLARE AUTOROTATION
A flare autorotation (fig. 77) enables the pilot to land a helicopter at any speed between that resulting in little or no landing run, up to that of a no-flare autorotation; that is, anywhere between a zero groundspeed and the speed of touchdown resulting from a no-flare autorotation. The speed at touchdown and the resulting ground run will depend on the rate and amount of the flare - the greater the degree of flare and the longer it is held, the slower the touchdown speed and the shorter the ground run. The slower the speed desired at touchdown, the more accurate must be the timing and speed of the flare, especially in helicopters with low inertia rotor systems.
TECHNIQUE:
1. Enter the autorotation in the same manner as the no-flare autorotation. The technique is the same to the point where the flare is to begin. This point is slightly lower than the point at which the nose is raised in the no-flare autorotation.
2. At approximately 35 to 60 feet above the surface, depending on the helicopter (check the manufacturer's recommendation), initiate the flare by moving the cyclic stick to the rear. Heading is maintained by the pedals. Care must be taken in the execution of the flare so that the cyclic control is not moved rearward so abruptly as to cause the helicopter to climb, nor should it be moved so slowly as to allow the helicopter to settle so rapidly that the tail rotor might strike the surface. As forward motion decreases to the desired groundspeed, move the cyclic control forward to place the helicopter in preparation for landing attitude. (If a landing is to be made, the throttle should be rotated to the closed or override position at this time; if a power recovery is to be made, it should be made as the helicopter reaches the landing attitude.)
Figure 77 - Flare autorotation and touchdown.
3. The altitude at this time should be approximately 3 to 10 feet, depending upon the helicopter being used. If a landing is to be made, allow the helicopter to descend vertically. Apply collective pitch, as necessary, to check the descent and cushion the landing. As collective pitch is increased, hold the throttle in the closed position so the rotor will not re-engage. Additional right pedal is required to maintain heading as collective pitch is raised due to the reduction in rotor RPM and the resulting reduced effect of the tail rotor.
4. After touchdown and after the helicopter has come to a complete stop, lower the collective pitch to the full-down position.
COMMON ERRORS:
1. Failing to use sufficient right pedal when power is reduced.
2. Lowering the nose too abruptly when power is reduced, thus placing the helicopter in a dive.
3. Failing to maintain desired rotor RPM.
4. Application of up-collective pitch at an excessive altitude resulting in a hard landing, loss of heading control, and possible damage to the tail rotor and to the main rotor blade stops.
5. Pulling the nose up just prior to touchdown on full autorotation.
POWER RECOVERY FROM PRACTICE AUTOROTATIONS
A power recovery is used to terminate practice autorotations at a point prior to actual touchdown. After the power recovery, a landing can be made or a go-around initiated.
TECHNIQUE:
1. To make a power recovery after the flare or level-off from an autorotation, coordinate upward collective pitch and increase throttle to join the needles at operating RPM. The throttle and collective pitch must be coordinated properly. If the throttle is increased too fast or too much, an engine overspeed will occur; if throttle is increased too slowly or too little in proportion to the increase in collective pitch, a loss of rotor RPM will result. Use sufficient collective pitch to check the descent and coordinate left pedal pressure with the increase in collective pitch to maintain heading.
2. If a go-around is to be made, the cyclic control should be moved forward to re-enter forward flight. If a landing is to be made following the power recovery, the helicopter can be brought to a hover at normal hovering altitude.
3. In transitioning from a practice autorotation to a go-around, care must be exercised to avoid an altitude-airspeed combination which would place the helicopter in an unsafe area of the height-velocity chart for that particular helicopter.
COMMON ERRORS:
1. Initiating recovery too late requiring a rapid application of controls, resulting in overcontrolling.
2. Failing to obtain and maintain a level attitude near the surface.
3. Adding throttle before collective pitch is applied.
4. Failing to coordinate throttle and collective pitch properly, resulting in either an engine overspeed or a loss of RPM.
5. Failing to coordinate left pedal with the increase in power.
RAPID DECELERATION OR QUICK STOP
Although used primarily for coordination practice, decelerations (fig. 78) can be used to make a quick stop in the air. The purpose of the maneuver is to maintain a constant altitude, heading, and RPM while slowing the helicopter to a desired groundspeed. The maneuver requires a high degree of coordination of all controls. It is practiced at an altitude that will permit a safe clearance between the tail rotor and the surface throughout the maneuver, especially at the point where the pitch attitude is highest. The altitude at completion should be no higher than the maximum safe hovering altitude prescribed by the manufacturer. In selecting an altitude at which to begin the maneuver, the overall length of the helicopter and the height-velocity chart must be considered.
Although the maneuver is called a rapid deceleration or quick stop, this does not mean that it should be rushed to completion. The rate of deceleration is at the discretion of the pilot. A quick stop is completed when the helicopter comes to a hover during the recovery.
Figure 78 - Rapid deceleration or quick stop.
TECHNIQUE:
1. Begin the maneuver at a fast hover speed headed into the wind at an altitude high enough to avoid danger to the tail rotor during the flare but low enough to stay out of the height-velocity chart shaded area throughout the performance. This altitude should be low enough that the helicopter can be brought to a hover during the recovery.
2. The deceleration is initiated by applying aft cyclic to reduce forward speed. Simultaneously, the collective pitch should be lowered as necessary to counteract any climbing tendency. The timing must be exact. If too little down-collective is applied for the amount of aft cyclic applied, a climb will result. If too much down-collective is applied for the amount of aft cyclic applied, a descent will result. A rapid application of aft cyclic requires an equally rapid application of down-collective. As collective pitch is lowered, right pedal should be increased to maintain heading and throttle should be adjusted to maintain RPM.
3. After speed has been reduced to the desired amount, recovery is initiated by lowering the nose and allowing the helicopter to descend to a normal hovering altitude in level flight and zero groundspeed. During the recovery, collective pitch should be increased as necessary to stop the helicopter at normal hovering altitude; throttle should be adjusted to maintain RPM; and left pedal should be applied as necessary to maintain heading.
COMMON ERRORS:
1. Initiating the maneuver by applying down-collective.
2. Applying aft cyclic stick too rapidly initially, causing the helicopter to "balloon" (a sudden gain in altitude).
3. Failing to effectively control the rate of deceleration to accomplish the desired results.
4. Allowing the helicopter to stop forward motion in a tail-low attitude.
5. Failing to maintain proper RPM.
SLOPE OPERATIONS
The approach to a slope is similar to the approach to any other landing area. During slope operations, allowance must be made for wind, barriers, and forced landing sites in case of engine failure. Since the slope may constitute an obstruction to wind passage, turbulence and downdrafts must be anticipated.
Slope landing
Usually, a helicopter should be landed on a cross-slope rather than on an upslope. Landing downslope or downhill is not recommended because of the possibility of striking the tail rotor on the surface.
TECHNIQUE:
1. At the termination of the approach, move slowly toward the slope, being careful not to turn the tail upslope. The helicopter should be hovered in position cross-slope over the spot of intended landing (fig. 79).
2. A downward pressure on the collective pitch will start the helicopter descending. As the upslope skid touches the ground, apply cyclic stick in the direction of the slope. This will hold the skid against the slope while the downslope skid is continuing to be let down with the collective pitch.
3. As collective pitch is lowered, continue to move the cyclic stick toward the slope to maintain a fixed position, and use cyclic as necessary to stop forward or aft movement of the helicopter. The slope must be shallow enough to allow the pilot to hold the helicopter against it with the cyclic stick during the entire landing. (A slope of 5° is considered maximum for normal operation of most helicopters. Each make of helicopter will generally have its own peculiar way of indicating to the pilot when lateral cyclic stick travel is about to run out; i.e., the rotor hub hitting the rotor mast, vibrations felt through the cyclic stick, and others. A landing should not be made in these instances since this indicates to the pilot that the slope is too steep.)
4. After the downslope skid is on the surface, continue to lower the collective pitch full down. Normal operating RPM should be maintained until the full weight of the helicopter is on the skids. This will assure adequate RPM for immediate takeoff in case the helicopter should start to slide down the slope. Pedals should be used as necessary throughout the landing to maintain heading. Before reducing the RPM, move the cyclic stick as necessary to check the security of the helicopter.
COMMON ERRORS:
1. Failure to maintain proper RPM throughout the entire maneuver.
2. Lowering the downslope skid too rapidly.
3. Applying excessive cyclic control into the slope, causing mast bumping.
SLOPE TAKEOFF
The procedure for a slope takeoff is almost the exact reverse of that for a slope landing (fig. 79).
Figure 79 - Slope landing or takeoff.
TECHNIQUE:
1. Adjust throttle to obtain takeoff RPM and move the cyclic stick in the direction of the slope so that the rotor rotation is parallel to the true horizontal rather than the slope.
2. Apply up-collective pitch. As the helicopter becomes light on the skids, apply pedal as needed to maintain heading.
3. As the downslope skid is rising and the helicopter approaches a level attitude, move the cyclic stick back to the neutral position, keeping the rotor disc parallel to the true horizon. Continue to apply up-collective pitch and take the helicopter straight up to a hover before moving away from the slope. In moving away from the slope, the tail should not be turned upslope because of the danger of the tail rotor striking the surface.
COMMON ERRORS:
1. Failure to adjust cyclic stick to keep the helicopter from sliding downslope.
2. Failure to maintain proper RPM.
3. Holding excessive "upslope" cyclic stick as the downslope skid is raised.
RECOVERY FROM LOW ROTOR RPM
Recovery from low rotor RPM is a procedure used to return to the normal rotor operating RPM. This recovery procedure, if performed properly, will normally regain lost rotor RPM while still maintaining flight. A low rotor RPM condition is the result of having an angle of attack on the main rotor blades (induced by too much upward collective pitch) that has created a drag so great that engine power available, or being utilized, is not sufficient to maintain normal rotor operating RPM.
When a low rotor RPM condition is realized, immediately lower the collective pitch. This action will decrease the angle of attack of the main rotor blades which, because of reduced rotor drag, will momentarily relieve excessive engine load. This action will also cause the helicopter to settle because some lift will be lost. As the helicopter begins to settle, smoothly raise the collective pitch just enough to stop the settling motion. This procedure, under critical conditions, may have to be repeated to regain normal rotor RPM or, if terrain permits, a landing may be necessary to restore the RPM. When operating at sufficient altitudes above the surface, however, it may be necessary to lower the collective pitch only once to regain sufficient rotor RPM. The amount that the collective pitch can be lowered will depend on the altitude available at the time the low rotor RPM condition occurs. When hovering near the surface, the collective pitch should be lowered cautiously to preclude hard contact with the surface. When the RPM begins to increase and attains approximately normal rotor operating RPM, anticipate decreasing the throttle slowly to prevent the engine from overspeeding.
If recovery from a low rotor RPM condition is not made soon enough, lifting power of the main rotor blades will be lost, including pedal effectiveness. Pedal ineffectiveness occurs as a result of the loss of tail rotor RPM because the tail rotor RPM is directly proportional to the main rotor RPM. If pedal effectiveness is lost, and the altitude is such that a landing can be made before the turning rate increases dangerously, decrease collective pitch slowly, maintain a level attitude with cyclic control, and land.
"S" TURNS
"S" turns present one of the most elementary problems in the practical application of the turn and in the correction for wind drift in turns. The reference line used, whether a road, railroad, or fence, should be straight for a considerable distance and should extend as nearly perpendicular to the wind as possible.
The object of "S" turns is to fly a pattern of two half circles of equal size on opposite sides of the reference line (fig. 80). The maneuver should be started at an altitude of 500 feet above the terrain and a constant altitude maintained throughout the maneuver. "S" turns may be started at any point. However, during early training, it may be beneficial to start on a downwind heading. Entering downwind permits the immediate selection of the steepest bank that is desired throughout the maneuver. The discussion that follows is based on choosing a reference line that is perpendicular to the wind and starting the maneuver on a downwind heading.
As the helicopter crosses the reference line, a bank is immediately established. This initial bank will be the steepest used throughout the maneuver since the helicopter is headed directly downwind. The bank should be gradually reduced as necessary to describe a ground track of a half circle. The turn should be timed so that, as the rollout is completed, the helicopter is crossing the reference line perpendicular to it and headed directly upwind. A bank is immediately entered in the opposite direction to begin the second half of the "S." Since the helicopter is on an upwind heading, this bank (and the one just completed before crossing the reference line) will be the shallowest in the maneuver. It should be gradually increased as necessary to describe a ground track which is a half circle identical in size to the one previously completed on the other side of the reference line. The steepest bank in this turn should be attained just prior to rollout (when the helicopter is approaching the reference line nearest to a downwind heading).
Figure 80 - "S" turns.
This bank, along with the initial bank entered at the beginning of the maneuver, will be the steepest bank used in "S" turns. The turn should be timed so that, as the rollout is completed, the helicopter is crossing the reference line perpendicular to it and again headed directly downwind.
As a summary, the angle of bank required at any given point in the maneuver is dependent on the groundspeed - the faster the groundspeed, the steeper the bank; the slower the groundspeed, the shallower the bank. Or, to express it another way, the more nearly the helicopter is to a downwind heading, the steeper the bank; the more nearly it is to an upwind heading, the shallower the bank.
In addition to varying the angle of bank to correct for drift in order to maintain the proper radius of turn, the helicopter must also be flown with a drift correction angle (crab) in relation to its ground track, except of course, when it is on direct upwind or downwind headings or there is no wind. One would normally think of the fore and aft axis of the helicopter as being tangent to the ground track pattern at each point. However, this is not the case. During the turn on the upwind side of the reference line (side from which the wind is blowing), the nose of the helicopter will be crabbed toward the outside of the circle. During the turn on the downwind side of the reference line (side of the reference line opposite to the direction from which the wind is blowing), the nose of the helicopter will be crabbed toward the inside of the circle. In either case, it is obvious that the helicopter is being crabbed into the wind just as it is when trying to maintain a straight ground track. The amount of crab depends upon the wind velocity and how nearly the helicopter is to a crosswind position. The stronger the wind, the greater the crab angle at any given position for a turn of a given radius. The more nearly the helicopter is to a crosswind position, the greater the crab angle. The maximum crab angle should be at the point of each half circle farthest from the reference line.
A standard radius for "S" turns cannot be specified. This radius will depend on the airspeed of the helicopter, the velocity of the wind, and the initial bank chosen for entry.
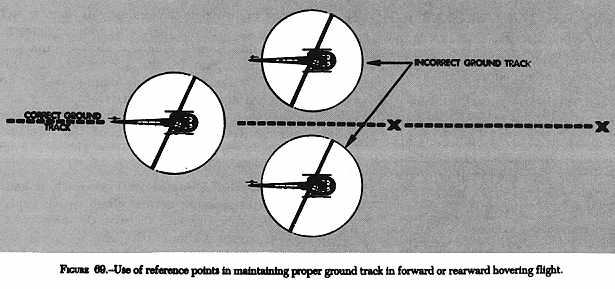
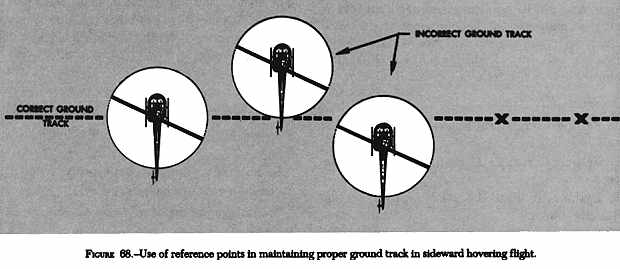
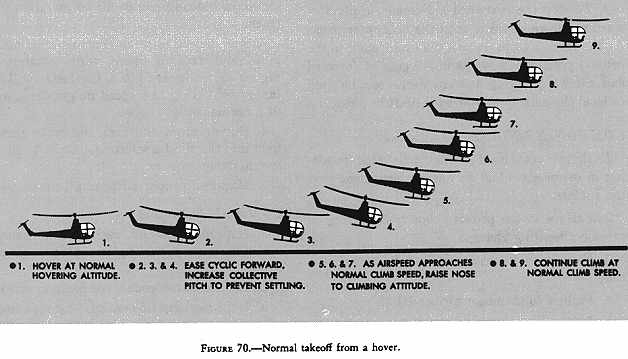
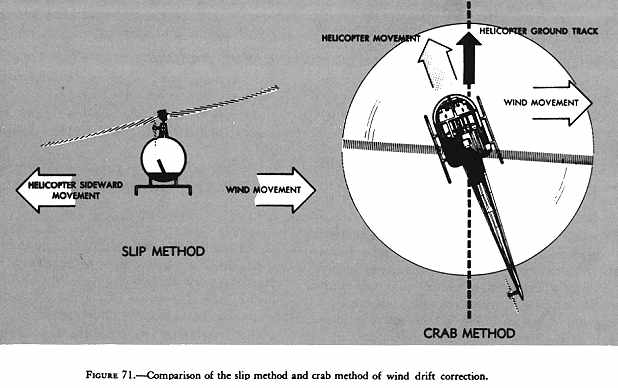
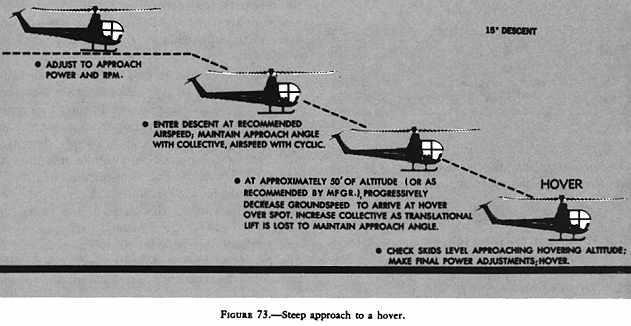
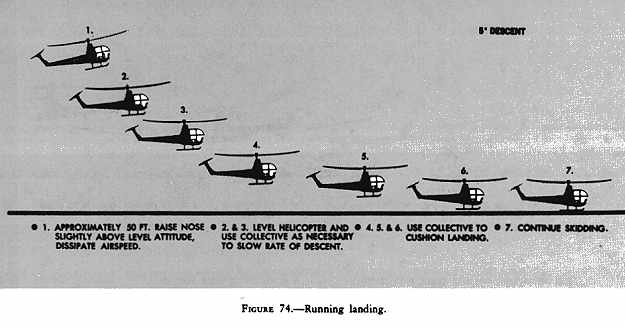
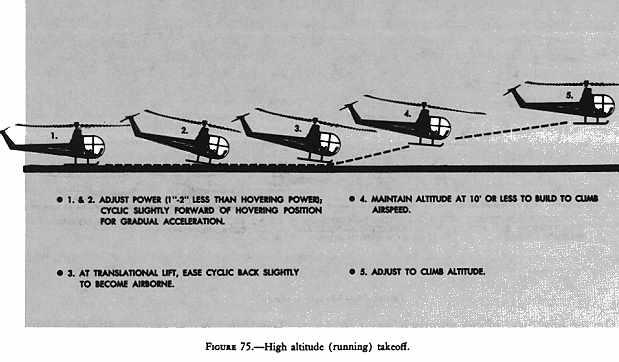
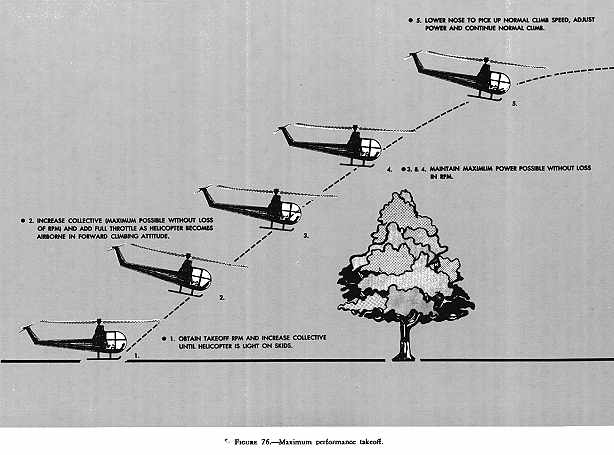
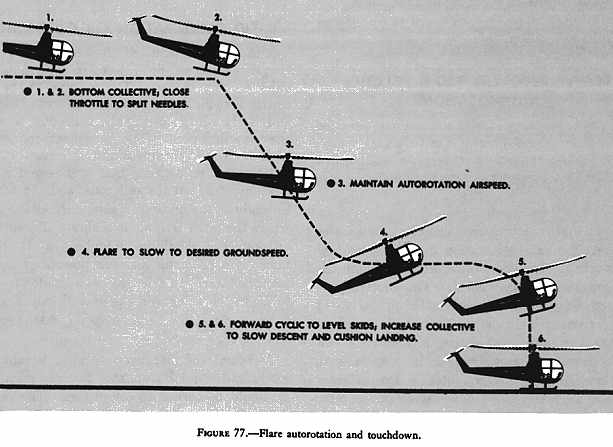
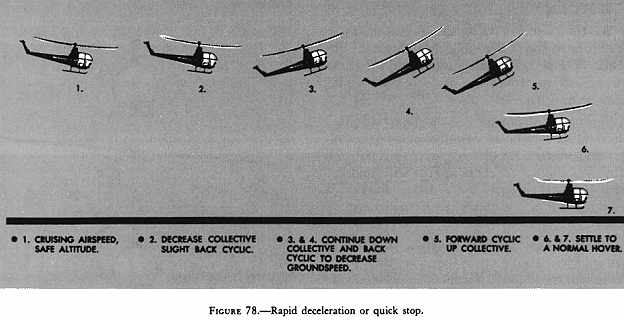
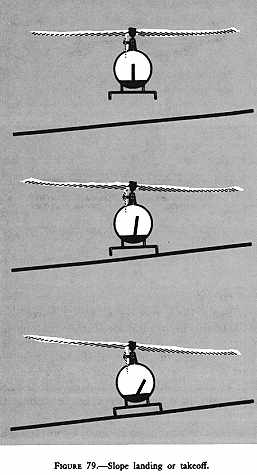
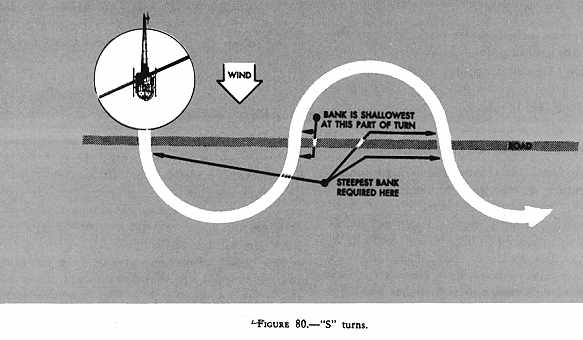